Managing AWS cloud infrastructure using AWS CLI
This article will help you to learn Basic of AWS command line interface.
What is AWS?

AWS is on-demand cloud service provider company which works on pay-as-you-go model . Amazon Web Services offers reliable, scalable, and inexpensive cloud computing services. you will only pay for what you use Instead of investing upfront amount on infrastructure. There are mainly three main types of service provided by aws cloud Infrastructure as a Service, Platform as a Service, and Software as a Service. Each type of cloud computing provides different levels of control, flexibility, and management so that you can select the right set of services for your needs
There are three ways to interact with AWS cloud-
- WebUI
- Programming Language (SDK)
- CLI
What is AWS CLI ?
The AWS command line interface is a unified tools to interact with AWS service using commands. With just one tool to download and configure, you can control multiple AWS services from the command line and automate them through scripts.
How to install and Configure AWS CLI?
To install the AWS CLI first download from the link given below and simple click-click as we install any other application.
To download AWS CLI:-https://docs.aws.amazon.com/cli/latest/userguide/install-cliv2.html
After installing the AWS CLI open the terminal and run the following command to check whether it installed or not.

To configure we need Access key and Secret key to provide identity.
Mainly Authentication can be done in two ways-
- Username and password(for human Access)
- Access key and Secret Key(for programatic access)
>>To get access key and Secret key we need to go to the IAM service inside AWS Account Web Console and create one user.
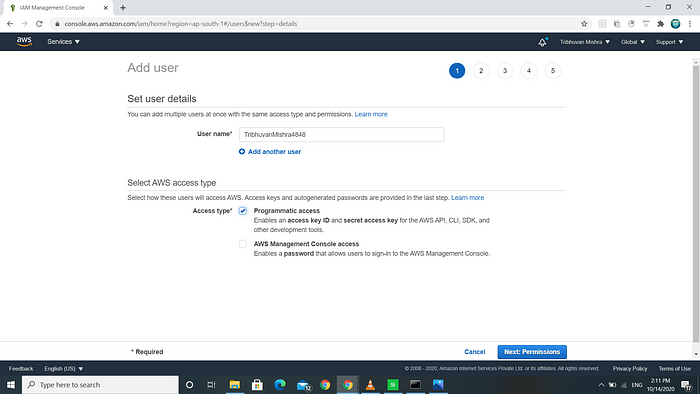
1.Click on Add User

2.Set Username & allow programatic access

3.Go to permission and click on attach the existing policy

4.Click on tags ,provides the tag and then review

5.Now click on Create User and you will provided with access key and Secret Key. Download the .csv file for future configuration.

Now configure AWS CLI with AWS account and run the following command ,provide access key and secret key and choose the region/location of data centre where you want to launch your infrastructure.

we can find the basic commands of AWS through the document of AWS CLI using following command
aws help
aws <command> help
aws <command> <subcommand> help
>>In this article we are going to perform the following task using AWS CLI and verify it through WebUI:-
🔅Create a key pair
🔅 Create a security group
🔅 Launch an instance using the above created key pair and security group.
🔅 Create an EBS volume of 1 GB.
🔅 The final step is to attach the above created EBS volume to the instance you created in the previous steps.
Step-1 :- Create a key pair
A key pair consisting of a private key and a public key, is a set of security credentials that you use to prove your identity when connecting to an instance(OS).To create the key pair which is used to attached with instances for authentication, we have following command -
aws ec2 create-key-pair — key-name hadoop

Now to verify the key “hadoop” created through AWS WebUI

Step-2 :- Create a security group
security group acts as a virtual firewall for your EC2 instances to control incoming and outgoing traffic. Inbound rules control the incoming traffic to your instance, and outbound rules control the outgoing traffic from your instance. When you launch an instance, you can specify one or more security groups.for creating security group ,we have following command
aws ec2 create-security-group --description Security_group_using_AWS_CLI --group-name hadoopseckey
Now verify it through AWS WebUI that security group created .


Now set the inbound rule to allow the outside traffic (SSH protocol which works on port no.22 ) using following command-
aws ec2 authorize-security-group-ingress --group-id sg-04c382b3e7c4c6813 --protocol tcp --port 22 --cidr 0.0.0.0/0
Step-3 :- Launch an instance using the above created key pair and security group.
Elastic compute Cloud (EC2) is a service by AWS which is used provide Compute-as-a-service(RAM/CPU).To launch EC2 instance having above Key-pair “hadoop” and security group “hadoopseckey” run the following command-
aws ec2 run-instances --image-id ami-052c08d70def0ac62 --security-group-ids sg-04c382b3e7c4c6813 --instance-type t2.micro --subnet-id subnet-0b1c1863 --key-name hadoop
Now, we can see it on console too.

Here we can check the key-pair and security group attached with instances.

Step-4 :- Create an EBS volume of 1 GB.
Elastic Block Storage (EBS) comes under EC2 service of AWS.To create the EBS volume of 1 GB we have following command-
aws ec2 create-volume --availability-zone ap-south-1a --size 1 --volume-type gp2
Now, you can see volume of 1 GB created on console.

Step-5 :- attach the above created EBS volume to the instance
To attach the EBS volume with the instance created above ,we have following command-
aws ec2 attach-volume --instance-id i-07b7804b1f32dca07 --volume-id vol-0629146e128f674c2 --device /dev/sda2
Here,we can see there are two Volume attached with instance .first one is attached at the time of provisioning of instance and second volume is attached by us.

Hence, we have successfully attached the EBS Volume.
